先前都有在使用Mac app來幫我在電腦上倒計時,但有些功能需要付費才可以解鎖,剛好附近有人有在弄Mac app,想說自己來寫一個倒數計時器,在這邊紀錄一下製作的過程。
安裝Xcode
工欲善其事必先利其器,在開始寫app之前,需要先安裝Apple的Xcode,可以直接去App Store裡面下載,只不過要先空下電腦裡面30GB的空間才可以下載,雖然我自己看安裝完成只佔了10GB左右。
創建Project
在前面的部分主要是參考這篇教學來設定好project,並弄出最基本的框架,如果覺得底下的步驟看不太懂的話,建議看看這篇教學。
- 點選File→New→Project
- 選擇
App - 設定project名稱
- Interface選擇
SwiftUI - Language選擇
Swift - 選定project存放的位置以後按下
Create
執行完上面的步驟以後就完成了基本的project設定了,接下來就可以開始著手建造自己的app。
製作Popover
在創建好project以後,Xcode會自動先生成兩個.swift檔,分別是AppDelegate.swift和ContentView.swift,我的理解是,程式執行時,會先執行AppDelegate.swift裡面的applicationDidFinishLaunching(),而在該function裡面會去new ContentView的物件來展示畫面給使用者,可以想成是ContentView.swift是用來刻UI,而AppDelegate.swift用來實作feature。
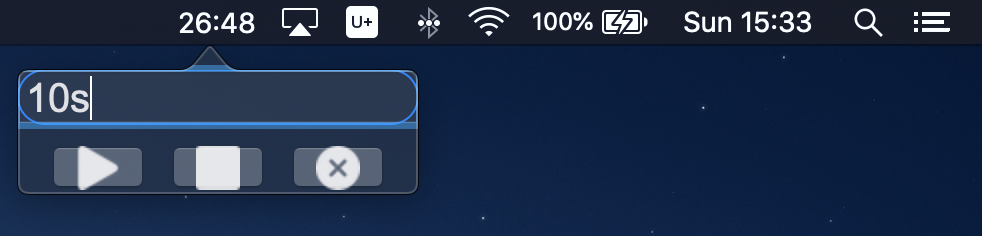
而在這邊我想要做的是像底下的popover,點選menu bar上面的icon以後,跳出一個視窗讓使用者輸入時間,所以預設的大部分程式碼都可以先刪除。
為了創建popover我們會需要宣告一個NSPopover的物件,一個簡單的例子如下
import Cocoa
import SwiftUI

@NSApplicationMain
class AppDelegate: NSObject, NSApplicationDelegate {
    var popover: NSPopover!

    func applicationDidFinishLaunching(_ aNotification: Notification) {
        // Create the SwiftUI view that provides the window contents.
        let contentView = ContentView()

        // Create the popover
        let popover = NSPopover()
        popover.contentSize = NSSize(width: 200, height: 50)
        popover.behavior = .transient
        popover.contentViewController = NSHostingController(rootView: contentView)
        self.popover = popover
    }
}
在上面的例子裡面,我們將contentView放進popover裡頭,所以在ContentView.swift裡面刻的UI就會顯示在popover裡面了。
製作Menu Bar Item
在設定好popover該顯示的東西以後,我們還需要將一個按鈕放到Mac的menu bar上面,讓使用者點選這個按鈕以後跳出popover。
import Cocoa
import SwiftUI

@NSApplicationMain
class AppDelegate: NSObject, NSApplicationDelegate {
    var popover: NSPopover!
    var statusBarItem: NSStatusItem!

    func applicationDidFinishLaunching(_ aNotification: Notification) {
        // Create the SwiftUI view that provides the window contents.
        let contentView = ContentView()

        // Create the popover
        let popover = NSPopover()
        popover.contentSize = NSSize(width: 200, height: 50)
        popover.behavior = .transient
        popover.contentViewController = NSHostingController(rootView: contentView)
        self.popover = popover

        // Create the status item
        self.statusBarItem = NSStatusBar.system.statusItem(withLength: CGFloat(NSStatusItem.variableLength))

        if let button = self.statusBarItem.button {
            button.image = NSImage(named: "Icon")
            button.action = #selector(togglePopover(_:))
        }
    }

    @objc func togglePopover(_ sender: AnyObject?) {
        if let button = self.statusBarItem.button {
            if self.popover.isShown {
                self.popover.performClose(sender)
            } else {
                self.popover.show(relativeTo: button.bounds, of: button, preferredEdge: NSRectEdge.minY)
            }
        }
    }
}
在上面的程式碼裡面,我們建立了一個按鈕並設定它被點擊的時候呼叫tooglePopover()這個函式,而在該函式裡面會去顯示/隱藏popover。另外,在創建按鈕的時候有設定它顯示的圖片,設定的方式請參考下面的章節。
引入圖片至Project
- 點選
Assets.xcassets - 在跳出的畫面左下角有個
+的符號 - 設定圖片的名稱,這個名稱需要跟程式碼裡頭的一致
- 在右邊的側欄裡面可以設定圖片的一些屬性,如果是要放在menu bar的圖示的話,可以參考教學裡面的Createing a Menu Bar Icon的設定。
- 將圖片拖曳到Xcode裡面的方框中就完成了
在Dock裡面隱藏App
由於想要做的是menu bar app,不希望程式在執行的時候在dock也出現圖示,這時可以去Info.plist裡面加入Application is agent (UIElement)這個參數並將value設成YES。
至此,一個簡單的popover app就完成了,底下會簡單介紹一下在製作倒數計時器的時候用到的一些東西,如果想看完整的程式碼,可以參考最後完成的成品,或許可以解決部分你遇到的問題。
Swift Timer
我所製作的倒數計時器主要是使用Swift的Timer這個class來完成主要的功能,Timer會根據使用者指定的時間固定去執行設定好的函式,詳細的介紹可以參考這篇教學。
let timer = Timer.scheduledTimer(withTimeInterval: 1.0, repeats: true, block: { timer in
    // Your function here
})
在上面的程式碼裡面,我們製作了一個Timer,它每過一秒就會執行大括號裡面的程式碼。
如果想要讓這個Timer停下來,不再每秒執行,只需要呼叫invalidate()即可。
timer?.invalidate()
值得一提的是,Timer一旦被invalidate以後,如果未來還想要它繼續執行的話,就得要重新製作一個Timer,不能重複利用,建議將創建Timer弄成一個function以方便快速的建立。
為App建立Global Shortcut
在Swift裡面好像沒有可以直接設定global shortcut的方法,讓你能在任意視窗按下設定好的快捷鍵就打開你所寫的app,好在網路上有很多大神有做了好用的package,只要加進去project裡面就能簡單做到了,在這裡我所使用的是KeyboardShortcuts這個套件。
Swift Package Manager
將套件加入project的方式還蠻簡單的,點選menu bar的File→Swift Packages→Add Package Dependency…,在跳出的視窗貼上package GitHub repository的網址,最後按下確認就可以了。
KeyboardShortcuts
在引入好KeyboardShortcuts以後,只需要使用下面的程式碼就能設定好global shortcut了。
import KeyboardShortcuts

extension KeyboardShortcuts.Name {
    static let toggleUnicornMode = Self("togglePopover", default: .init(.k, modifiers: [.command, .option]))
}

@main
class AppDelegate: NSObject, NSApplicationDelegate {
    func applicationDidFinishLaunching(_ aNotification: Notification) {
        // Set shortcut action
        KeyboardShortcuts.onKeyUp(for: .togglePopover) { [self] in
            // Your function here
        }
    }
}
在extension的部分,我們設定快捷鍵為command+option+k,並觸發togglePopover這個名字的function。
在app運行的時候我們還需要去綁定togglePopover這個名字實際上是去連接到哪一個function,也就是設定KeyboardShortcuts.onKeyUp()的部分。
在App內播放音樂
將音樂引入project
直接從Finder裡面將音檔拖曳到Xcode左邊側欄的檔案列表就行了。
播放音樂
這邊使用Swift內建的套件來達成。
import AVFoundation

// Import sound file
let bundle = Bundle.main
guard let sound = bundle.path(forResource: SOUND_PATH, ofType: SOUND_TYPE) else { return }
do {
    print("Found sound file")
    let audioPlayer = try AVAudioPlayer(contentsOf: URL(fileURLWithPath: sound))
} catch {
    print("Sound file not found")
}

// Play music audioPlayDefaultCount+1 times
audioPlayer.numberOfLoops = audioPlayDefaultCount
audioPlayer.currentTime = 0
audioPlayer.play()
audioPlayer.stop()
在import sound file的部分需要將SOUND_PATH和SOUND_TYPE替換掉,SOUND_PATH就是音檔的名稱,但不包含副檔名,而SOUND_TYPE是音檔的副檔名,像是.wav等。
在使用時可以透過numberOfLoops設定音樂要播幾次,音樂會播你所設定的數字加一次,所以如果只想播一次的話,可以不寫這行或是將數字設成0,如果是負數的話就會不斷循環播放不停止。
在上面的例子裡面有將currentTime設為0,其原因是當我們呼叫stop()以後,下次在呼叫play()時,會從上次停止的地方再開始播放,如果想要從頭播放的話,就需要將currentTime設成0。
傳送通知
如果想要讓app發出系統通知顯示在螢幕的右上角,可以參考底下的程式碼,只需要修改title和informativeText就能決定顯示在通知裡面的文字訊息。
let notification = NSUserNotification()
notification.title = "Time's Up !!!"
notification.informativeText = "Click notification to dismiss"
notification.soundName = NSUserNotificationDefaultSoundName
NSUserNotificationCenter.default.deliver(notification)
如果想要讓使用者點選通知以後觸發某個動作,這時需要一個繼承了NSObject和NSUserNotificationCenterDelegate的class,並override userNotificationCenter這個函式,最後在NSUserNotificationCenter綁定這個class的instance。
class NLUTimer: NSObject, NSUserNotificationCenterDelegate {
    func showNotification() {
        let notification = NSUserNotification()
        notification.title = "Time's Up !!!"
        notification.informativeText = "Click notification to dismiss"
        notification.soundName = NSUserNotificationDefaultSoundName
        notification.hasActionButton = false
        NSUserNotificationCenter.default.delegate = self // Binding this instance
        NSUserNotificationCenter.default.deliver(notification)
    }

    func userNotificationCenter(_ center: NSUserNotificationCenter, didActivate notification: NSUserNotification) {
        print("Click notification")
        // Do what you want here

        // Close notification
        NSUserNotificationCenter.default.removeAllDeliveredNotifications()
    }
}
輸出成.app的格式
在完成了project的所有功能以後,Xcode有提供打包成.app的功能,方便開發者分享給其他使用者。
只需要在Xcode的menu bar點選Product→Archive,在跳出的視窗選擇Distribute App→Copy App,最後選擇輸出的路徑就可以了。